
ESET NOD32 for Windows - Multi-User Pack - Install Guide
請選擇語言 / Please select the language: 繁體 - English
A. Registration of ESET NOD32
Please visit https://www.eset.hk/download/register/?lang=en to input Product Serial Number and related information to register NOD32.
Please be remarked that you must input information with the column marked with * symbol. You will receive new username and password through the email address you provided within 15 minutes.
* After you registered the serial number once, it will activate all the number of users you purchased at the same time and all the licensed computers will be used the same username and password.

B. How to install
-
Please visit https://www.eset.hk/download/purchased_software/ for download the NOD32 setup file suit to your operation system.

-
How to install
Once you launch the installer, the installation wizard will guide you through the basic setup process.
Important: Make sure that no other antivirus programs are installed on your computer. If two or more antivirus
solutions are installed on a single computer, they may conflict with each other. We recommend that you uninstall any
other antivirus programs on your system. See also our knowledgebase article (available in English and several other
languages).
First, the program checks if a newer version of ESET NOD32 Antivirus is available. If a newer version is found, you will
see the following window:
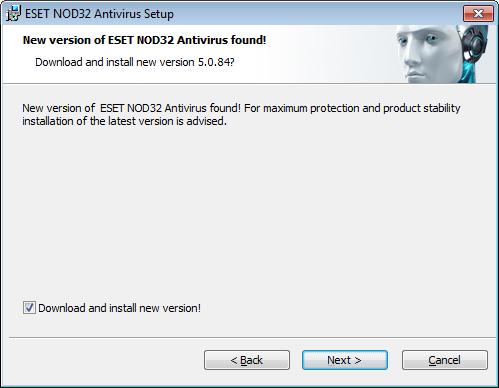
If you select the Download and install new version option, the new version will be downloaded and the installation
will continue. In the next step the End-User License Agreement will be displayed. Please read and click Accept to
acknowledge your acceptance of the End-User License Agreement. After you accept the installation will continue in two
possible scenarios:
1. Installation of the ESET NOD32 Antivirus over a previous version of this software. The following window lets you
choose to either use your current program settings for your new installation, or, if you uncheck the Use current
settings option, you will be able to choose between the Typical installation and the Custom installation modes.
 2. If you are installing ESET NOD32 Antivirus on a computer without a previous version of the program, you will see thewindow below, after you accept the End-User License Agreement. Here, you can choose between a Typicalinstallation and a Custom installation and continue accordingly.
2.1 Typical installation
Typical installation mode provides configuration options appropriate for most users. These settings provide excellent
security, easy setup and high system performance. Typical installation mode is the default option and is recommended
if you do not have the particular requirements for specific settings.
After selecting the installation mode and clicking Next, you will be prompted to configure the ESET Live Grid. The ESET
Live Grid helps to ensure that ESET is immediately and continuously informed about new infiltrations in order to quickly
protect our customers. The system allows you to submit new threats to ESET‘s Virus Lab, where they are analyzed,
processed and added to the virus signature database.

By default, the I agree to participate in ESET Live Grid option is selected, which will activate this feature.
The next step in the installation process is to configure detection of potentially unwanted applications. Potentially
unwanted applications are not necessarily malicious, but can often negatively affect the behavior of your operating
system. See the Potentially unwanted applications chapter for more details.

Select the Enable detection of potentially unwanted applications option to allow ESET NOD32 Antivirus to detect
this type of applications.
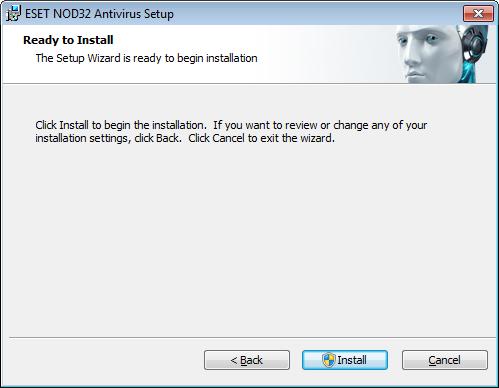
The final step in Typical installation mode is to confirm installation by clicking the Install button.
After the installation is completed, you will be prompted to activate your product.
If you purchased a retail boxed version of the product, it already contains an Activation Key along with step-by-step
activation instructions. The Activation Key is usually located inside or on the back side of the product package. For a
successful activation, the Activation Key must be entered as supplied.
If you received a Username and Password, select the Activate using a Username and Password option and enter the
license data in the appropriate fields.
If you would like to evaluate ESET NOD32 Antivirus before making a purchase, select the Activate Trial License option.
Fill in your email address and country to activate ESET NOD32 Antivirus for a limited time. Your test license will be
emailed to you. Trial licenses can only be activated once per customer.
If you do not have a license and would like to buy one, click the Purchase License option. This will redirect you to the
website of your local ESET distributor.

Select the Activate Later option if you would like to quickly evaluate our product and do not wish to activate it
immediately.
You can also activate your copy of ESET NOD32 Antivirus directly from the program. Click the ESET NOD32 Antivirus
icon located in the top right corner or right-click ESET NOD32 Antivirus system tray icon and then click Product
activation... from the menu.

2.2 Custom installation
Custom installation mode is designed for users who have experience with fine-tuning programs and who wish to
modify advanced settings during installation.
After selecting this installation mode and clicking Next, you will be prompted to select a destination location for the
installation. By default, the program installs in:
C:\Program Files\ESET\ESET NOD32 Antivirus\
Click Browse... to change this location (not recommended).

After entering your username and password, click Next and proceed to configuring your Internet connection.
If you use a proxy server, it must be correctly configured for virus signature updates to work. If you are not sure
whether you use a proxy server to connect to the Internet, select the I am unsure if my Internet connection uses a
proxy server option. Use the same settings as Internet Explorer (Recommended) and click Next. If you do not use a
proxy server, select the I do not use a proxy server option.

To configure your proxy server settings, select I use a proxy server and click Next. Enter the IP address or URL of your
proxy server in the Address field. In the Port field, specify the port where the proxy server accepts connections (3128 by
default). In the event that the proxy server requires authentication, enter a valid Username and Password to grant
access to the proxy server. Proxy server settings can also be copied from Internet Explorer if desired. To do this, click
Apply and confirm the selection.
This installation step allows you to designate how automatic program updates will be handled on your system. Click
Change... to access the advanced settings.

If you do not want program components to be updated, select the Never update program components option. Select
the Ask before downloading program components option to display a confirmation window each time the system
attempts to download program components. To download program component upgrades automatically, select the
Always update program components option.

NOTE: After a program component update, a restart is usually required. We recommend selecting the If necessary,
restart computer without notifying option.
The next installation window offers the option to set a password to protect your program settings. Select the Protect
configuration settings with a password option and choose a password to enter in the New password and Confirm
new password fields, which will be required to change or access the settings of ESET NOD32 Antivirus. When both
password fields match, to click Next to continue.

The next two installation steps, ESET community online service ESET Live Grid and Detection of potentially
unwanted applications are handled the same as in the Typical installation mode (see “Typical installation”).
Click Install in the Ready to install window to complete installation. After the installation is completed, you will be
prompted to activate your product. See typical installation for more information about product activation.
2.3 Upgrading to a newer version
Newer versions of ESET NOD32 Antivirus are issued to bring improvements or fix issues that cannot be resolved by
automatically updating of the program modules. Upgrading to a newer version can be accomplished in several ways:
1. Automatically, by means of a program update
Since the program upgrade is distributed to all users and may have impact on certain system configurations, it is
issued after a long testing period to function with all possible system configurations. If you need to upgrade to a
newer version instantly after it has been released, use either of the following methods.
2. Manually, in the main program window by clicking Install/Check in Update > Available version of ESET NOD32
Antivirus.
3. Manually, by downloading and installing a new version over the previous one.
At the beginning of installation, you can choose to preserve current program settings by selecting the Use current
settings check box.
2.4 Entering username and password
For optimal functionality, it is important that the program is automatically updated. This is only possible if the correct
username and password are entered in the Update setup.
If you did not enter your username and password after the installation, you can do so now. From the main program
window, click Update, then Product activation... and enter the license data you received with your ESET security
product into the Product activation window.
When typing your Username and Password, it is important to type them exactly as they are written:
- The username and password are case sensitive and the hyphen in the username is necessary.
- The password is ten characters long and all lowercase.
- We do not use the letter L in passwords (use the number one (1) instead).
- A big '0' is the number zero (0), a little 'o' is the lowercase letter o.
We recommend copying and pasting the data from the registration email for maximum accuracy.
2.5 Computer scan
After installing ESET NOD32 Antivirus, you should perform a computer scan to check for malicious code. From the main
program window, click Computer scan and then click Smart scan. For more information about computer scan, see
section Computer scan.

24 hours Instant Web Support services:
24 Hours Technical Support Hotline: (852) 2893 8186